-
Multiple flight modes for Cleanflight with Taranis
FrSky X9D Plus Taranis or cheaper FrSky Taranis Q X7 or even more expensive X10S Horus, are incredible radios. But also can be intimidation when migrating from simpler radios. A great example is mixing multiple switches into 1 channel to pass flight mode to the flight controller. Yes, you can do it, but it can be a pain in the ass on a Mixer level. I've lost a lot of time trying to understand the logic behind mixer weight and offset only to discover possibility to replace channel value, not add. And everything was simple again. So, here what I wanted, and what I did.
What I wanted
When I fly bigger FPV quadcopter, I want to use 7 different flight modes:
- Angle without Altitude Hold (no BARO),
- Horizon without Altitude Hold (no BARO),
- Acro/Rate without Altitude Hold,
- Angle with Altitude Hold (BARO),
- Horizon with Altitude Hold (BARO),
- Position Hold with Altitude Hold (BARO),
- Return To Home with Altitude Hold (BARO)
And I've figured out, that 3 switches should be used to enable all the flight modes: SC, SD, and SG. SC toggles Angle/Horizon/Acro. SD switches PosHold and RTH (as well as BARO and overrides SC and SG). SG enables Altitude Hold but only when SC is in up or middle position. 3 switches, 7 modes. I could do it with 3 radio channels, but that would have few flaws: would use 3 channels instead of one, and would allow for mistakes like no BARO with POSHOLD. So, advanced mixes and logical switches that is. Read more... -
What is PID controller?
Multicopter is an unstable machine. It requires constant corrections to keep is stable in the air. This is done with PID control loop. When quadcopter does not fly like you hoped, you will hear: "Tune your PIDs". Nice. But what exactly is PID? If you did not studied control theory, and you do not want to start, you read internet. And internet tries to explain PID in various ways. Some are better, some are worse, and there is always room for a new one. So here we go.
Officially, PID goes for Proportional, Integral, Derivative. Wikipedia provides enough of long and boring theory. If it's TL;DR, here is a short summary:
- PID controller measures error of current output and desired output,
- This error is processed separately by P, I and D modules,
- Then, output of each module is multiplied by it's coefficient (Kp, Ki, Kd) and added all together as an controllers output,
- Controller can be tuned by changing Kp, Ki and Kd values,
- In a multicopter, there is separate controller for each axis (roll, pitch, yaw) working based on rotation speed provided by gyros. This is called and "inner loop".
- Some flight modes adds "outer loop" with separate PID controller that is translating user input into values used by "inner loop". Outer loop is much less important than inner loop and usually there is not need to tune it,
- Flight modes like Attitude, Angle, Horizon (all with self leveling) are using both outer and inner loop,
- Flight modes like Rate, Acro and using only inner loop,
- When speaking on PID tuning, in 99% of cases we will be talking about tuning the "inner loop",
- Inner loop tuning should be done only in Rate/Acro flight modes (no self leveling) and avoid complex outer-inner loop interactions.
-
Raspberry Pi + MOSFET = High power switch
With all the possibilities, Raspberry Pi requires additional hardware to turn on and off any additional hardware. GPIOs built in power limit is low: 3.3V, 16mA per GPIO, but not more that 50mA total). And while it might be enough to light a small LED, it is not enough for anything else. Forget about motors, strong LEDs, relays. Anything that uses more that 16mA on input will destroy Raspberry Pi.
Luckily, there are things called MOSFET. To keep things short: they are special kind of transistors that can be used to turn on and off devices with high power requirements. Unfortunately, most MOSFETs require more that 3.3V Raspberry Pi GPIO provides. So you either have to use 3.3V logic compatible MOSFETs or add few other elements and use more common 5V compatible MOSFET like 30N06. And 30N06 MOSFET transistor can handle a lot of thing: up to 30A and 60V. So it's more that enough to handle most 12V motors, relays, lights, LEDs, etc.
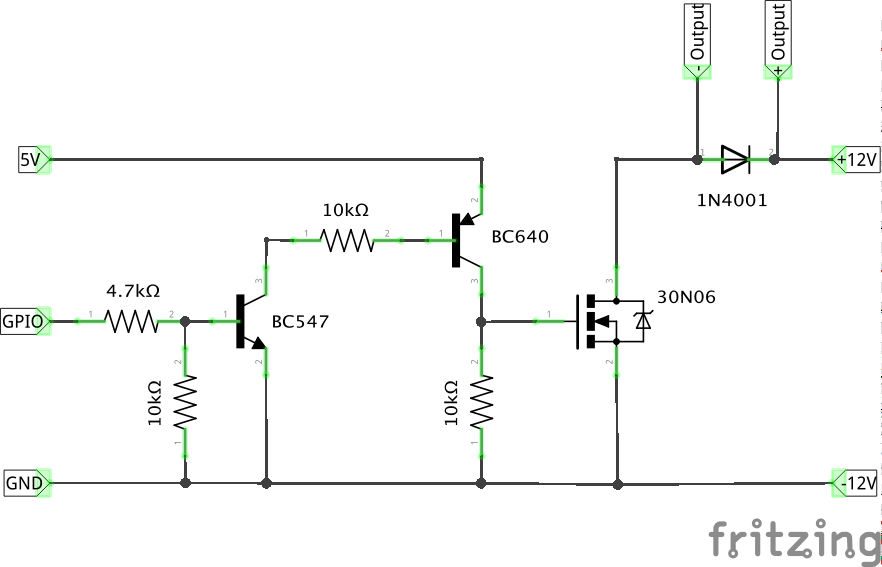
Required elements:
- NPN BC547 (or compatible) transistor,
- PNP BC640 (or compatible) transistor,
- 30N06 MOSFET transistor,
- 3x 10kOhm resistors,
- 4.7kOhm resistors,
- 1N4001 (or similar) diode
If it was Arduino with 5V logic, transistors would not be required. But with Raspberry Pi's 3.3V logic they are required to bump voltage from 3.3V GPIO port provides to 5V MOSFET needs. Additionally, if we would be powering any coil device (motor, relay), flyback diode would be required to secure MOSFET from voltage spikes. Even if there is no coil, flyback diode still can be used. Just to be safe.
Read more... -
RedCruiser - DIY Depron airplane for FPV
Few months ago I've wrote about my first handmade Depron airplane. It was cool design. Super simple, with KFm-2 airfoil, durable and easy to fly. But it had few serious flaws:
- motor mounted in front of fuselage is great for flight characteristics, but propellers breaks all the time. Even with prop savers,
- big fuselage is not the same as fuselage with a lot of space inside.
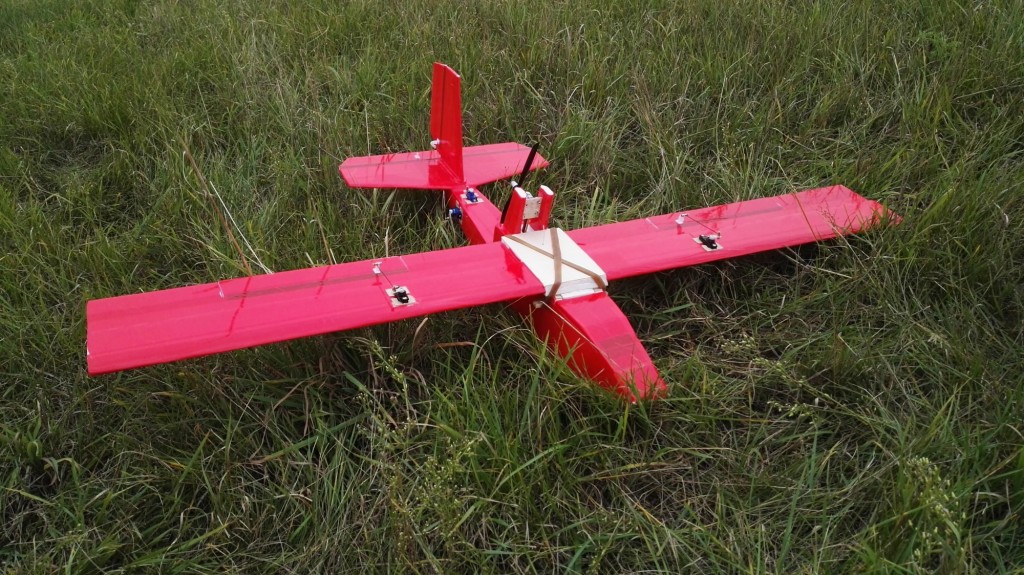
That's why, I have build a second Depron airplane. This time with pusher propeller mounted on a tower behind wing. Wing is almost the same design as in my first airplane. It is still an KFm-2 (Kline-Folgeman, modified) airfoil, 150mm chord, 12mm thick. But is a little shorter: 1200mm instead of 1250mm. The main difference is inside wing. Instead of carbon fiber spars I've used two carbon fiber 6mm pipes. That gives plenty of stiffness. Wing almost does not bend in flight, even during hard maneuvers. And generates more than enough lift to give nice, slow flying experience without danger of heavy stall. You really have to want to stall it. And event when it stalls, it recovers nicely: drops a nose, dives for a second or two, and you have lift again. No need to work with rudder, just let it dive and gain speed and then level. Read more...
-
Reptile 500 PID values for Cleanflight
After few test flights I have to admit, that PID values for Reptile 500 quadcopter frame I posted here are too aggressive. Way too aggressive. Specially D coefficient was too big and was main source of high frequency vibrations visible as camera jello. Reducing P and D, and slight increase of I improved quadcopter behavior. Current settings:
- Raptile 500 frame, EMAX GT2218/09 motors, APC 10x4.5MR propellers,
- Flip32+,
- Cleanflight 1.10,
- PID controller: LuxFloat,
- Looptime: 2000
- PIDs:
- Roll (P / I / D): 1.8 / 0.07 / 30
- Pitch (P / I / D): 1.8 / 0.07 / 30
- Yaw (P / I / D): 2.5 / 0.1 / 0
Video has been processed with slight software camera stabilization. Standard settings from iMovie.
Read more... -
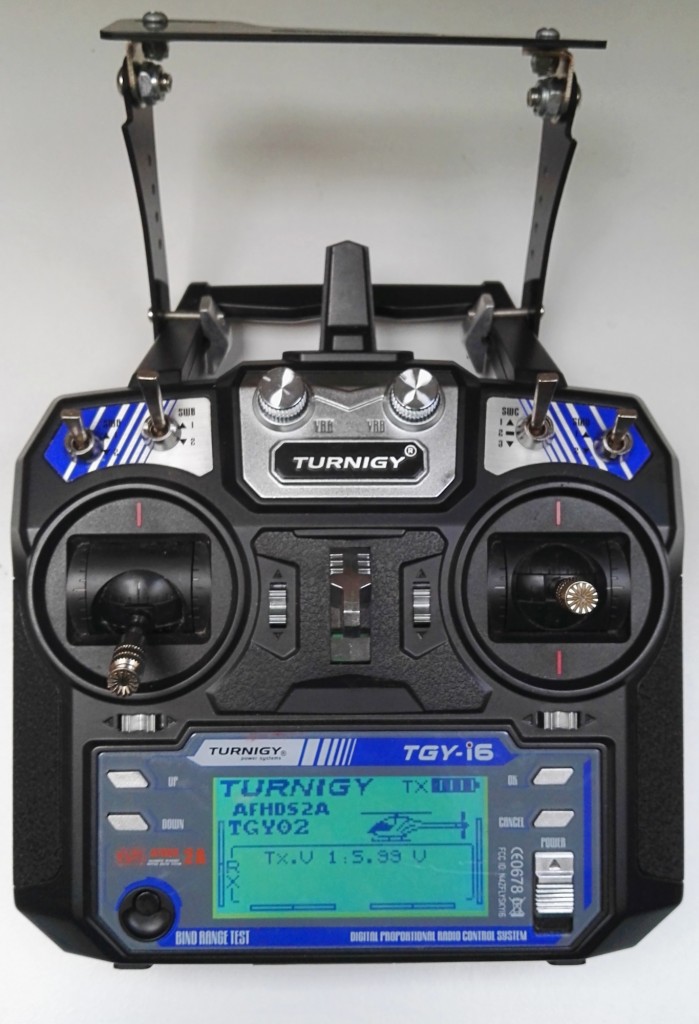
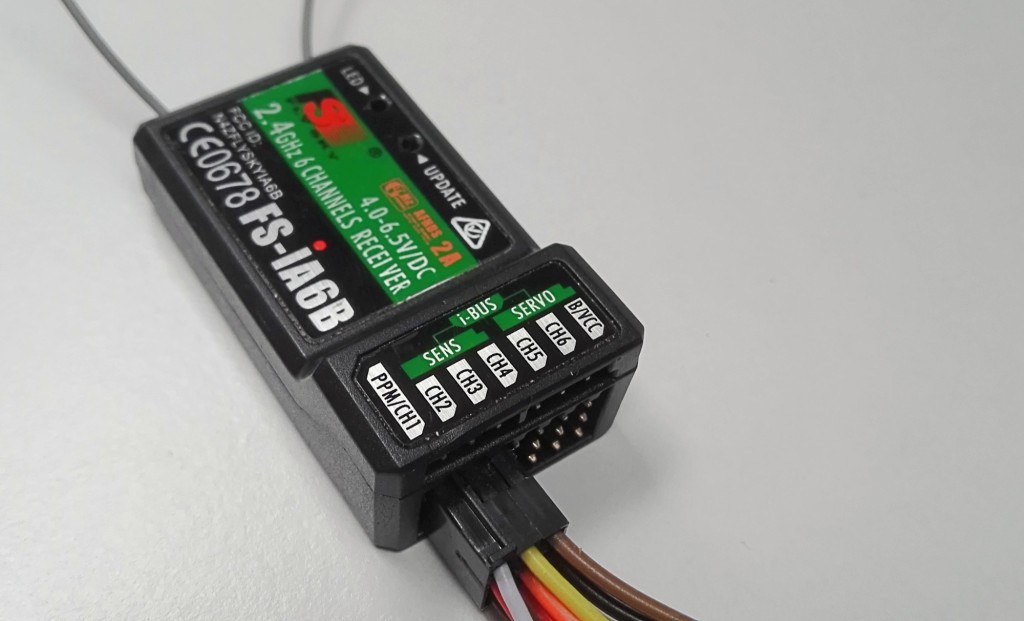
PPM signal support for FS-i6 radio
FlySky FS-i6 (or branded Turnigy TGY-i6) is a very decent 6 channel entry level RC radio system. But support for PPM (CPPM) standard is somehow not clear. I have no idea why manufacturer keeps PPM support data so well hidden. Anyway, here it is: how can I enable PPM on i6 radio system?
PPM signal is supported only on FS-iA6B (v2) receiver, FlySky FS-A8S Mini receiver and a couple of compatible ones: FlySky Pro Micro, FS82 Micro Receiver and iRangeX Tiny 2.4G 6CH Flysky Receiver
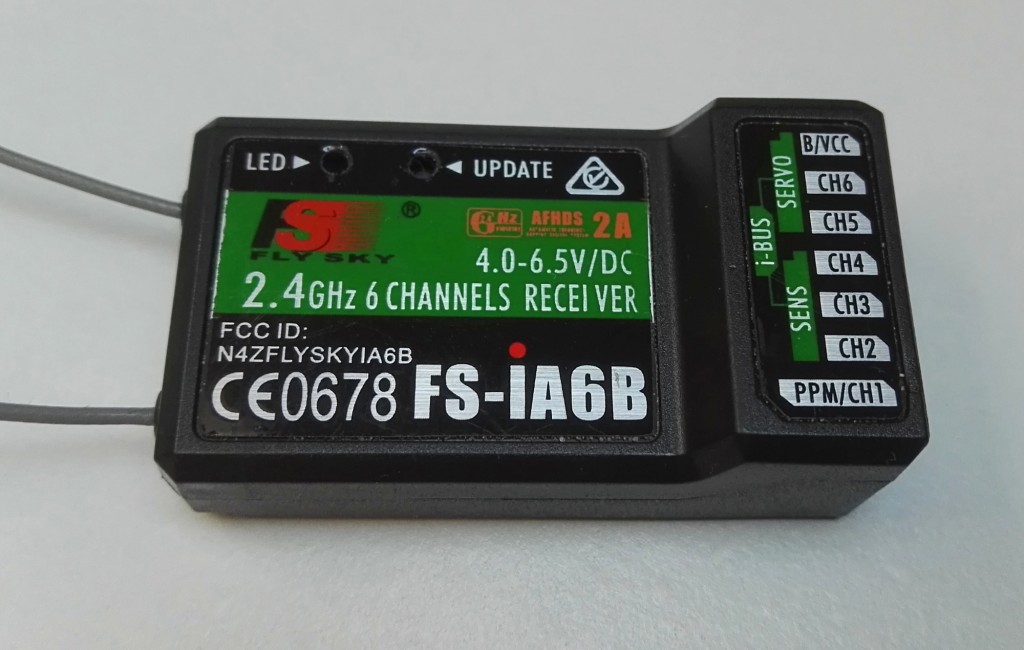
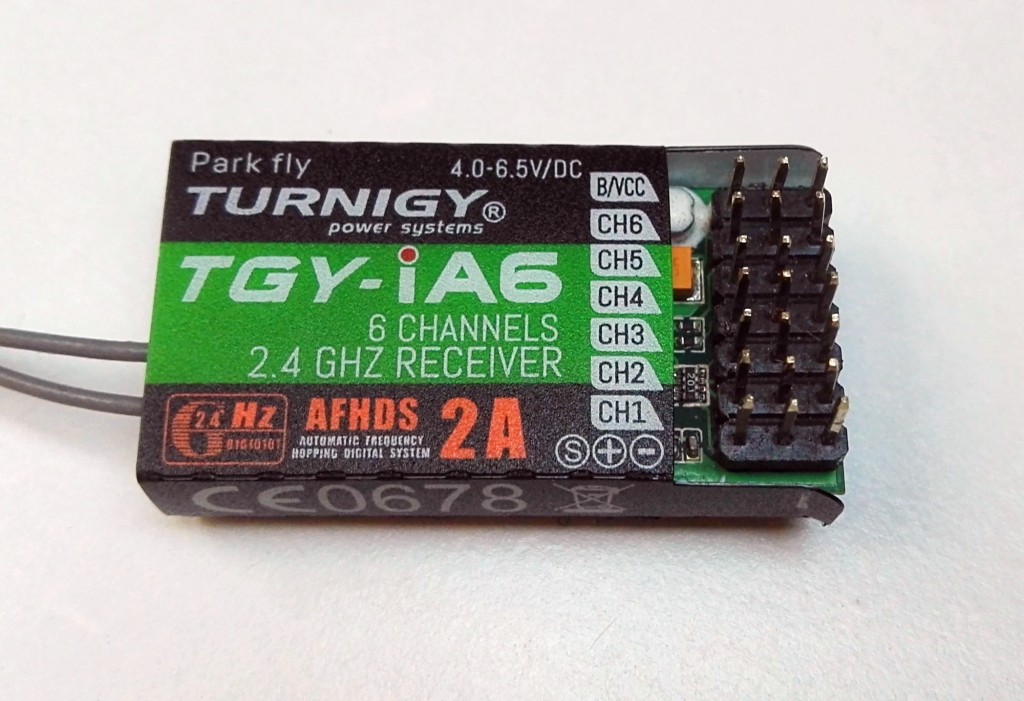
It is not possible to enable PPM signal on FS-iA6 receiver. So if you have simpler one, you would have to buy iA6B. Also, PPM signal is not enabled by default. To turn it on, you have to change radio settings:
- Open Menu and select "System setup"
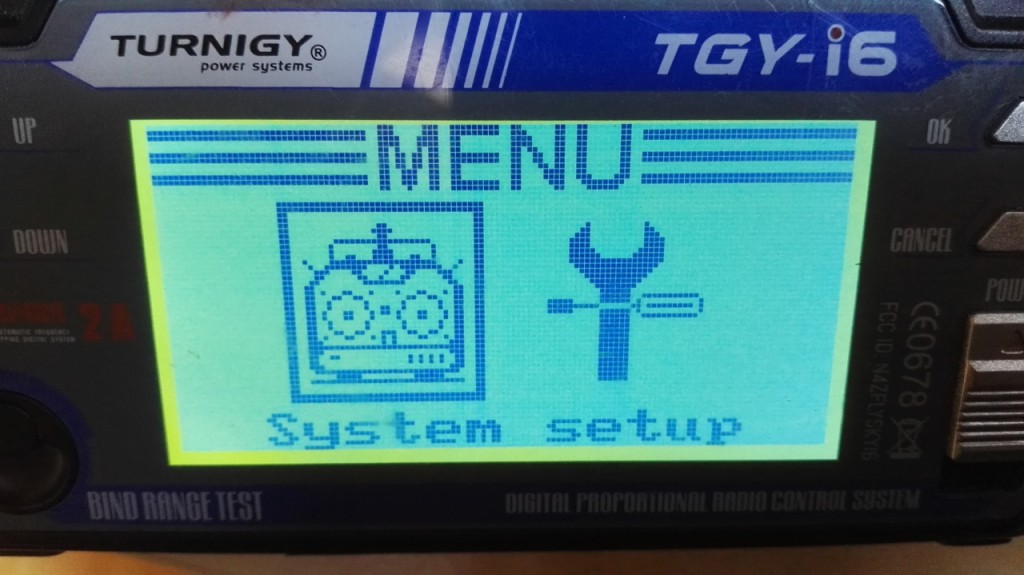
- Enter "RX Setup"

- Navigate to "PPM output"

- And change it to "On"
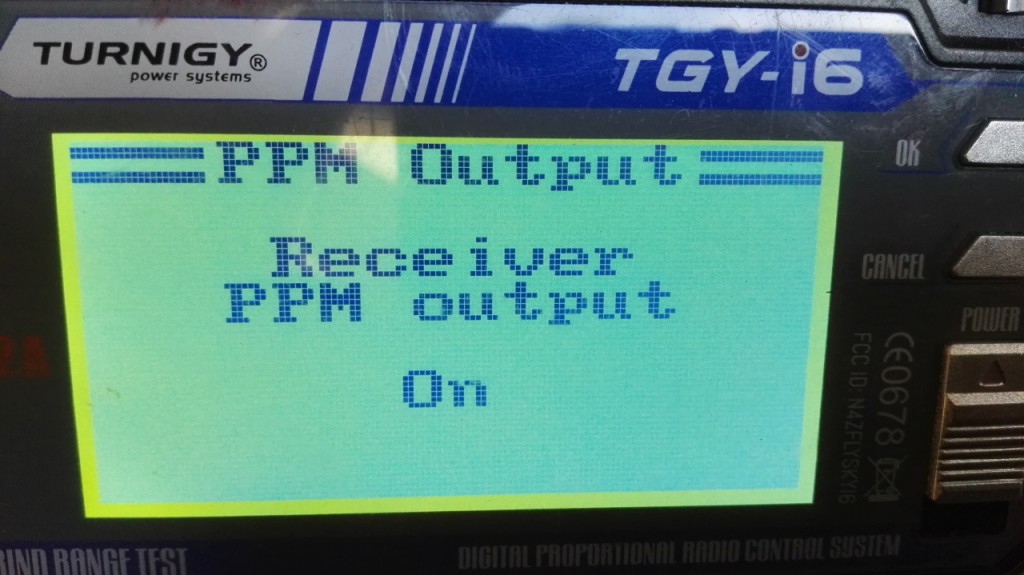
This is all. From now on, FS-iA6B will output PPM 6 channel signal on port 1 labeled "PPM/CH1".
You can get FS-iA6B from here.
Read more... - Open Menu and select "System setup"
-
PWM, PPM, and Serial RX explained
When speaking about radio systems for remote controlled models, multirotor, airplanes, gliders, there are some shortcuts that might be unknown for beginners. Those are: PWM, PPM, Serial RX, S.Bus. Today I will explain basic concepts behind them, and when they are used.
PWM
PWM, as Pulse Width Modulation, is something a standard for controlling different devices onboard remote controlled model. Almost all servos, ESC, flight controllers and radio receivers can work with PWM signal. There might be some exceptions, but they are so rare, that we can skip them.
Stick (switch, POT) position in PWM signal is encoded as length of signal. Signal that lasts 1000us encodes minimum stick position, and signal of 2000us encodes maximum stick position.
 In PWM, each channel is available as separate port of 3 pins (Ground, +5V, Signal). So, if receiver has 8 channels in PWM mode, that means that it has at least 8 ports of 3 pins. 24 pins, 24 cables, lots of mess. And this was great for airplanes, where each control surface is controlled by separate servo connected directly to the receiver. But is not so great for quadcopters and event airplanes with flight controller. Not only it requires a lot of cables, but also complicates things on flight controller's end. It requires an interrupt for each channel, takes a lot of space and to be honest, it's completely not needed. Why? Because we have something better...
Read more... -
Quick Review: FPV 1/4 CMOS HD Color Camera Module 600TVL 120 Degree Wide Angle
Usually I have absolutely nothing against buying cheap stuff from China. OK, maybe quality will not always be as expected, but usually it's not worth paying extra 100% in price for 10% of extra quality. Usually, with some exceptions. Exception number one are mechanical parts like motors. Exception number two are FPV cameras. And the second one is new one. I've put it in place after using FPV 1/4 CMOS HD Color Camera Module 600TVL 120 Degree Wide Angle from Banggood for one month.
-
5.8GHz FPV channel frequency table
For 5.8GHz FPV systems, there are 4 main bands divided into 8 channels each. That gives 32 channels free to use. So, in theory, 32 pilots should be able to fly FPV at the same time. Unfortunately, this is not true.
First of all, there are transmitters, and there are transmitters. Better, properly tuned, will broadcast in narrow frequency range. Cheaper, or just not properly tuned, will broadcast on much wider frequency range. The same goes for receivers. They can listen "only" to their frequency, but also to others. The result is, that a transmitter can pollute other channels. This is why, general rule is then 2 pilots should not fly on adjacent channels. If pilot A is using CH1, pilot B should use CH3 and so on.
Channel frequency for band (MHz) Channel A (FR1) B (FR2) E (FR3) F (FR4) 1 5865 5733 5705 5740 2 5845 5752 5685 5760 3 5825 5771 5665 5780 4 5805 5790 5645 5800 5 5785 5809 5885 5820 6 5765 5828 5905 5840 7 5745 5847 5925 5860 8 5725 5866 5945 5880 Second of all, frequencies assigned to channels can overlap with channels in different bands. Just look at the chart below.
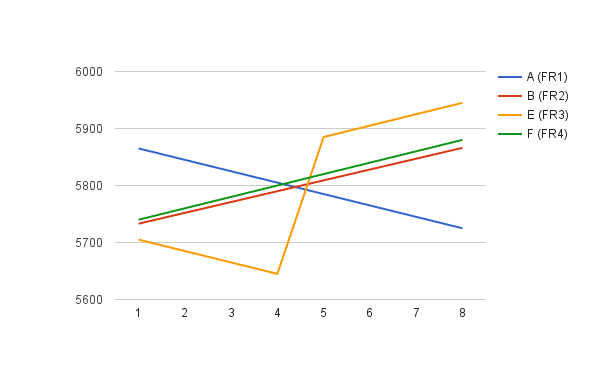
Not only frequency separation between bands B and F is smaller than expected, there might me overlaps, channel 4 is crowded and band E jumps high and low. Nightmare that concludes: you should not fly CH4 on bands A and F. Also better not to use CH4 in band B. Just to be on safe side. On the other hand, band E (FR3) is not overlapping with other bands. Also band A is quite safe as long as you are not using CH4.
Read more... -
Sad quadcopter is sad
Read more...


I'm Paweł Spychalski and I do things. Mainly software development, FPV drones and amateur cinematography. Here are my YouTube channels: